Breathe New Life Into An Old Computer

My laptop is an Averatec 3260. 512MB of RAM, 80GB hard disk, and 1.6GHz processor. It’s had the front panel LCD and battery replaced, by me. It’s still missing the front bezel (I thought it looked cooler with it off.) Up until yesterday, the performance of the machine was just above what I’d consider to be “survivable” regardless of OS.

Then, everything changed.

While I was working with Cory Fowler at Red Brick Cafe and then later at my apartment, I was updating my copy of Mandriva Linux from 2009.1 to 2010.0. During installation something must have gone wrong because KDE4 no longer started properly. It kept bringing me back to the login screen. So, instead of using KDE4 I used IceWM.

I haven’t gone back to KDE4 since yesterday. And I’m the hugest KDE4 fan there is.

If you’ve got an old laptop or an old desktop that’s struggling under the weight of Windows XP or KDE4, grab a copy of Mandriva Linux for free and install the IceWM packages. Give it a go. I’m sure you’ll be impressed with the performance of your machine. I know I was! I remember running IceWM a few times when I first started using Linux quite a number of years ago but it has really come a long way since then.

IceWM runs all of the KDE4 programs I care about and even the Gnome programs, too. Watching a video on YouTube is made much easier with the lighter-weight desktop, as is just general browsing.

IceWM offers a lot of customization but some of it is complicated to configure. The easiest thing to do is to replace the God-awful default theme with something way cooler and easier on the eyes. The theme I’m using now is psicopoire.

The Box-Look.org website includes hundreds of awesome themes you can try out. And installing them is actually pretty simple. To install a new theme in IceWM, try this:

  1. Download the tarball
  2. Untar the tarball into the ~/.icewm/themes directory (if it does not exist, create it)
  3. Right-click on the desktop and go to Settings->Themes->Your New Theme’s Name

Does anyone else know any other neat, lightweight software to replace large-scale, heavy applications? I’d love to give them a try.

Wake Yourself Up With Onlineclock.net

www.onlineclock.net
www.onlineclock.net

Since just after boxing day of 2008, I’ve been following the Everyman sleep pattern. I’ve stumbled a few times and had to reset, either from sickness or missing a nap. When things are running smoothly, I rely on Onlineclock.net to wake me up, wherever I am.

The site is simple and sweet. When you first navigate there, it displays the current time in red. You select from two drop-down menus what time you’d like the alarm to go off at. Make sure your sound is on and hit the sack. Nap time!

Unlimited Awesome: Linux script to convert mods to mp3

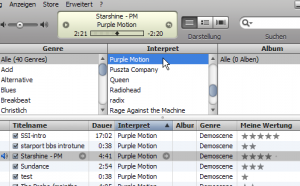
Listening to Purple Motion in iTunes :)

One day, Philipp Keller got fed up with installing sound libraries to listen to old-skool music files, so he decided to write a script that takes the hassle out of it and convert any mod to an mp3 file. Now you can download his script for free and use it on your own Linux box to convert your precious mod collection to mp3 for on-the-go listening.

Last.fm Integration

Playing your music modules as mp3 files has the added effect of allowing you to scrobble your music to Last.fm. Typically, playing anything but an mp3 causes Last.fm to disregard your tune. I know that if Last.fm or the WinAmp Audioscrobbler plugin took my mod playing seriously, I’d have a way different collection. Now I can.

Open source rules. Long live music modules!

Totally Loving Blippr

I found out about a really awesome site this week. It’s called Blippr. It’s basically Twitter but for game, music, movie, and book reviews. You have 160 characters to let the world what you think. It’s really addictive.

After creating a profile, you can link to your Facebook and Twitter accounts so any blips you write will be displayed there. This is great to help build some incoming links and keeps your Twitter fresh, which then pushes your profile page up in the search rankings. For a while there my Blippr profile was showing at the top of search results while searching “Rocky1138” on Google.

If you end up joining, add me as a friend and we’ll see how we stack up against each other in game, music, book, and movie reviews.

Make Firefox 3 look like Google Chrome

One of the best parts of Google Chrome is the theme. It’s simple and attractive. Now you can have that same theme (minus the top-window tab placement) in Firefox 3, thanks to a developer named “falconer”.

Download Chromifox, the Google Chrome theme for Firefox 3.

Update as of 2018-02-13: Extensions such as these are no longer supported by Firefox as it has moved to the new WebExtensions system. If you’re looking for alternatives to your favourite Firefox extensions take a look at this handy article from Digital.com.

Remember Pre-CU Star Wars Galaxies fondly? Play it again right now.

Wait, what? There’s a few groups of dedicated people out there committed to the idea of emulating the original Star Wars Galaxies in full pre-Combat Upgrade glory. When I say emulating, I don’t mean some hack-and-slash wannabe game — I mean the original software you used to use to connect to Star Wars Galaxies just like it used to be back in the day. Imagine that.

Here’s how.

#1. Register in the SWGEmu forum to create an SWGEmu user

Head to this forum to create a user and password, which you will use to log into the game.

#2. Install Star Wars Galaxies.

This is the hardest part for most of us because usually one friend somehow ends up with everyone’s discs. Typically it’s me becuase everyone used to LAN this game at my house. If you have your discs, install SWG normally.

#3. Install Launchpad Enhanced.

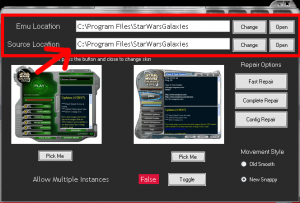
After installing this program, go into the “Options” menu and set both your “Emu Location” and “Source Location” to be the same directory. This will update your Star Wars Galaxies installation to the PreCU format used by the emulator.

Enhanced SWG Launchpad

#4. Select the SWGEmu Test Center and login!

You can start to play immediately. Just pick a username and password, create a character, and buff. Enjoy!

SWG Screenshot

SWG Screenshot

For even more SWG Emulation information, news, and community discussion, head over to the Galaxies Reborn forums!

Help the world: Run BOINC

BOINC Logo
BOINC Logo

What is your computer doing most of the day? Chances are, not much. Sure you’re editing a document or checking your E-Mail but is that really utilizing your computer’s full potential? Unless your computer is 10 years old, probably not!

So, what to do with all of this extra horsepower that’s just sitting there? Donate it to science!

The Berkeley Open Infrastructure for Network Computing or BOINC is a project that takes advantage of the untapped computing power of ordinary desktop computers and puts it to good use by participating in projects such as finding a cure for cancer, the search for extra-terrestrial intelligence, and fighting AIDS.

You can specify the program to run all the time like I do, but out of the box it runs only as a screensaver, which means that it will not make your computer slow and only is used when your computer is free. Having the program run full-time is a good option when your computer has more than one processor core (a dual-core or quad-core computer in most cases).

Over 500,000 computers worldwide work together to create a networked suptercomputer using distributed computing to solve some of the world’s problems.

After downloading the program to your computer and installing it you are asked to join a “project”. There are many projects that take advantage of the extensive network of desktop, servers, and super computers running the BOINC program. The ones mentioned before are just 3 of the many available to you.

An up-to-date list of the projects you can join.

I am, at the moment, associated with several projects including World Community Grid, SETI@Home, Rosetta@home, and Einstein@home.

For every bit of work you do as a BOINC user, you gain credits.  You, your team (if you choose to join one [Go Team Canada!]), and your country receive credits based on your work completed.

Rocky1138's BOINC statistics
Rocky1138’s BOINC statistics

Using BOINC is a fun way to take advantage of an idle computer. You can help out scientists all over the world across a wide array of projects. From aliens to sudoku puzzles, BOINC computes them all with lightning speed.

Sign up for free today!

Source Control – svn + ssh (subversion to the rescue!)

There comes a point in any developer’s life where he/she must work with one or more people on the same project. What’s the correct procedure? How is this done? There are a number of different ways. Some good, some bad.

The Bad: You may have a method in place where only one person can be working on a file at one time. You have to notify the other developers that the file is free when you’re done with it. They download the latest copy every time and so do you so as to not overwrite the work that was just completed.

Some of you may say “Well, why is this bad? We’ve done this for months! It’s worked out pretty well so far!” There are a number of different answers to this question, which I’m going to deal with right now.

This is a bad method because time is money and this method is much, much slower. What is a programmer to do while he or she is waiting for the file to be free for editing? Read blogs?

Time is money.

If the company had source control, both programmers could essentially be working on the same file at the same time. I say essentially because technically they both have their own versions of it and the source control program (Subversion is the one I would like to write about today) will merge their changes together intelligently. Oh wait, this isn’t good. Now you won’t have time to read my blog because you’ll be working!

The second reason the “one person, one file, one time” method is bad is because it’s extremely risky for accidentally deleting work and wasting hours of productivity. As a developer, you should be constantly using and building work methods that prevent failure at any level you are involved with.

How would you feel if you worked on a function for two hours, then because someone overwrote the file with their copy all your work was lost? The reverse is also true: How would you feel if when you saved your work you accidentally overwrote a day’s worth of work and changes?

Time is money. Again.

“But before you save your file you can make a backup of the original file!” I hear you saying, way in the back. Of course you could, but how far do you want to take that methodology? Will you remember every time? Will everyone who works on the project remember, every time? What if it’s a one-line fix? “Oh, I’ll just log in quickly and fix that typo.” and the like are sentences that run shivers down my spine when thinking about using this method.

So the person logs in and fixes the typo. Because it was a small fix, they never checked to see if anyone was working on the file. So now we’ve got two changes that need to be merged somehow. I’m sure that person will be wondering the next day why the typo has reappeared after you save your file!

Okay. So what’s the solution then, smarty-pants?

The good: The solution is source control. It’s not new. It’s been tested and proven multiple times in the computing industry and there are some big players that use it. There are a multitude of different kinds that do some different things, but to the layman the simplest way to look at it is to use a common source control program called Subversion. Everyone’s heard of it, a ton of people use it. Nerds of different flavors will tell you there are better ones out there, and that may be true, but Subversion works. For a lot of folks.

The concept is simple: A project is set up in the Subversion software. Two programmers “check out” (think of checking out at a grocery store) a copy of the project on their computer or development server and work completely independently.

Programmer “Jane” and “Jack” are both working on the same project. Jane is building a module not related to Jack but in a few cases they may modify the same files. That’s no cause for concern, deliberation, or communication. They happily keep on working until their particular task is complete.

Jane finishes first and “checks in” her work by “committing” her work to the Subversion server. Everything goes as planned and her work is then “committed” to the main project files. Jack finishes his work a few minutes later and attempts to check in his work. Uh-oh! Jack’s copy of the project is slightly out-of-date! No big deal, he issues the “svn update” command and all of the files Jane edited are updated on Jack’s computer. Any changes to the files that they both worked on are merged automatically.

After he has updated his copy of the project he commits his files and goes home for the day.

Wow! Sounds great. But what happens if Jack deletes parts of the source code that Jane edited?

This sort of thing is called a conflict. They’re pretty rare and in most cases you can resolve the conflict in a few minutes. When you edit a file that is marked “in conflict” by Subversion, it shows the added and removed portions. You can make adjustments based on which is correct and issue the “svn resolve” command to consider the issue resolved then commit the correct version.

Cool beans. How do I start?

First, you install Subversion on your server. Programmers will connect to this machine, “check out” a copy of the project, and begin work. In most cases, installing Subversion takes less than 10 minutes. You should check with your particular Operating System documentation to see how to install Subversion, but in Mandriva Linux you can do it through the command-line with this command (logged in as root):

# urpmi subversion

After installing Subversion, you will need to pick a spot on your hard drive where you want your project files to be located. For me, that’s almost always /home/svn. Change directory to your project directory and type:

# svnadmin create <projectname>

This will create a directory and place the important Subversion bits inside it for this all to function. Make sure the directory (and all subdirectories) are writeable by the group of users that will be working on the project by first first changing the ownership to a particular user and group with this command (run as root):

# chown -R user:devgroup <projectname>

This command makes the project directory and any directory inside of it owned by user and associated with the devgroup group. After this you will need to set the permissions on the directory so that the devgroup has read, write, and execute access to this directory. We do that by executing this command (run as root):

# chmod -R 775 <projectname>

Great! Our project is ready to roll. Note that this assumes you have ssh enabled on this server (very likely by in Linux, FreeBSD, and in fact most others *nix variants).

Next, we’ll need to check out a copy of our project. Stay tuned for that tutorial, coming soon!