Moving a site from Drupal 7 to WordPress

I’m in the process of moving my videogaming blog, GameBlaster64, over to WordPress. The most recent security vulnerability with Drupal coupled with the fact that core updates must still be done manually has pushed me to head in that direction. Drupal has always been a lot more work than WordPress and I didn’t really need all the extra functionality anyway.

In under a month, GameBlaster64 will be 4 years old. There are hundreds of posts, thousands of pages, and tons of images. It’s going to be 301 redirect galore. To help with this, I wrote a small PHP script to grab the URLs of the taxonomies and articles I’ve been writing. It uses WordPress functions to import blog posts, along with their attached tags from the Drupal 7 database.

Here is my script. If you’re moving from Drupal 7 to WordPress, you’ll hopefully find it useful.

Develop Locally With Linux, Apache, MySQL, and PHP

If you’d like to develop PHP and MySQL web apps in Linux but you’re not sure how to get started then feel free to follow along with this blog post. For the most part, installation and configuration is simple and straightforward.

Though this article is directed toward users of Mandriva Linux (my Linux distribution of choice for a desktop / web-development PC), the same instructions can apply to many of the different Linux distributions including Fedora, Red Hat Enterprise Linux, Ubuntu, and Eeebuntu. For a huge list and up-to-date news of Linux distributions available to you, take a look at the Distrowatch news site.

The easiest way to install all of the software in the LAMP stack (Linux Apache MySQL and PHP) quickly is to do it using the command-line (also known as the console). Since many new users are uncomfortable with the command-line, feel free to do all of these installations graphically using the software installer from your respective distribution.

If you’d like to proceed using the graphical installer built into Mandriva Linux, use the “Install & Remove Software” icon located in the main menu.

To install apache, mysql, and php using the Mandriva command-line, follow these instructions:

  • Open up a terminal by clicking on the Mandriva star and clicking on Terminal
  • Type “su” and press enter (this will log you in as the administrator or “root” user)
  • Enter your root password
  • Type “urpmi apache php mysql phpmyadmin nano”
  • If asked which version of apache, select a stable version to install (likely the first choice)
  • If asked which version of php, select the apache module version (not CGI or CLI)
  • If asked for permission to install extra software that is required for proper operation of the LAMP stack, select “yes” and proceed

Once the software has been installed, you should be able to open up Firefox and navigate to http://localhost . This should bring up a screen that says “It works!”, meaning that apache has been properly installed.

For reference, Mandriva Linux puts your web files in the directory /var/www/html . Straight away you may not be able to access those folders with your regular user so feel free to change the permissions of the directory recursively by using the command

chown -R yourusername:yourusername /var/www/html

Note that this operation is definitely not secure if you plan on actually hosting your website on the live Internet using this computer, but for local development you should be okay. :) To learn more about file and directory permissions in Linux, take a look at the official documentation.

Before you are able to access your databases through phpmyadmin, you will need to set your MySQL root password using the following command (being sure to change NEWPASSWORD to a password of your choice):

 mysqladmin -u root password NEWPASSWORD

Using Firefox (or whatever browser you normally use) navigate to http://localhost/phpmyadmin . Log into MySQL with your “root” user and the password you just entered into the command-line. This should give you access to your MySQL databases. For more information on how to use phpmyadmin, take a look at the official website.

Let’s create a small Hello World PHP web application by navigating to our web directory and creating it. Use the following commands to achieve this:

cd /var/www/html
nano test.php

In the editor screen that appears, enter

<?php echo "Hello World!"; ?>

Press CTRL-X and save the file before quitting. You should now be able to navigate to http://localhost/test.php and see your hello world application :)

Hopefully this has given you enough information to get you up and running. Please feel free to post comments if you’ve run into problems and hopefully I or another person in the community will be able to help you out.

Have fun with PHP on Linux!

Aptana Color Themes

Aptana Studio Rules
Aptana Studio Rules

When I develop at home and at work I use Aptana Studio. I purchased a license for myself at home and I use the community edition (read: free version) at work. It’s a wonderful editor with a ton of features and great community. One thing it lacks, however, is a good set of themes, out-of-the-box.

So what, you ask? Just go and download some third-party custom themes from the web!

Pishaw! It’s not that easy. I’ve done a few Google searches but not a whole lot turns up, to be honest. And that’s a shame because I bet a lot of developers are in the same boat as me.

I’ve been tinkering with themes over the past few weeks and I’ve decided to start releasing some on my site for everyone to use. The themes page will grow over time as I continue to release themes. I’d appreciate any feedback you have. The Aptana Themes page is not only for my themes, they also include some of the best themes I’ve found around the web. If you have a theme you’d like me to put up, send it to me and I’ll do just that.

Anyway, without further ado, I present the Aptana Themes page!

The Optimistic Programmer

Recently in the world of programming blogs there has been a string of articles by disenfranchised developers bemoaning their current work environment in a sarcastic and ultimately unproductive manner. I understand and appreciate sarcasm and tongue-in-cheek humor but what I have seen lately goes above and beyond simple satire to a new level of pessimism that in the end is more about self-serving venting than anything enjoyable to read or to learn from.

At first I shrugged off the first article, which was a negative play on a post I made last week, thinking that perhaps the writer had a bad day and was simply going a bit over-the-top. But then another post by a different author came up on DZone in the same light. And then another.

I then started to wonder why there was this growing trend into negative venting blog posts, where their only function is to belittle other peoples’ efforts and cause as much controversy as possible surrounding that subject.

When I started this blog I made a choice: I wanted to prepare and post articles that people could read and learn from or to be more realistic, to offer them alternative channels of thought so that they can continue their research until they find the solution they require.  I have made a personal choice to be an optimistic programmer, meaning I understand that while there will be times that I am incorrect or times where my example code was not the most efficient it is more important to accept that and learn to grown from it, moving onwards and upwards, than it is to be negative and post with the only intentions being to vent and complain without offering any sort of solution or assistance.

There have always been trolls on the internet. There always will be. The best thing I believe we can do as bloggers is to call it what it is and try to be above it by taking the good points of a negative experience and growing from it, not brooding over it.

UPDATE: Since posting this I have received E-Mails concering the troll label I have applied to these posts. Specifically to the first and last links. While I still disagree with the method of complaining or venting with no solutions presented, I have mistakenly grouped what the authors wanted to be humorous posts in with the negativity I was seeing at the outset. Perhaps troll was a bit harsh. I apologize :)

HTML Input Forms – Sending in an array in PHP

Arrays? Who needs ’em?

If you’re into developing websites chances are there will be sometime during your life/career when you’ll need to have users enter data into a HTML form but you have no idea how many of a certain variable they’re going to be sending in or how much data they’re going to fill in of the same type.

An example would be a HTML form that has three input boxes, one for each of your friend’s names (first and last). You are able to enter between 1 and 3 friends into the boxes. For such an example your HTML form may look something like this:

<form method="post" action="">
    <p>Enter your friend's names (first, last):</p>
    <input maxlength="30" name="friend1" size="30" type="text" />
    <input maxlength="30" name="friend2" size="30" type="text" />
    <input maxlength="30" name="friend3" size="30" type="text" />
    <input type="submit" value="Submit" />
</form>

That all looks fairly normal. Keep in mind this is a simple example. But, what about if you’ve got the option to enter 10 friends. What about 20? You might have to re-work your form if you want to enter 20 friends. Any more than 10 and you might want to look at alternatives like importing from XML or CSV.

Let’s say you’ve got the option to enter up to 10 names. Your increasingly ugly form would then look like this:

<form method="post" action="">   <p>Enter your friend's names (first, last):</p>   <input maxlength="30" name="friend1" size="30" type="text" />   <input maxlength="30" name="friend2" size="30" type="text" />   <input maxlength="30" name="friend3" size="30" type="text" />   <input maxlength="30" name="friend4" size="30" type="text" />   <input maxlength="30" name="friend5" size="30" type="text" />   <input maxlength="30" name="friend6" size="30" type="text" />   <input maxlength="30" name="friend7" size="30" type="text" />   <input maxlength="30" name="friend8" size="30" type="text" />   <input maxlength="30" name="friend9" size="30" type="text" />   <input maxlength="30" name="friend10" size="30" type="text" />   <input type="submit" value="Submit" /> </form>

When you submit this form then you’ve got to check each input box to first ensure they entered a variable and then check to see what that variable is. With so many input boxes to check from it becomes a repetitive and arduous task.

Example PHP code:

// Good God.. okay let's start this horrible task
if ($_POST['friend1']) {
    doSomething($_POST['friend1']);
} else {
    complain();
}
if ($_POST['friend2']) {
    ...
} else {
    complain();
}
if ($_POST['friend3']) {
    ...
} else {
    ...
}
...
...
// There's got to be a better way!

Save time with arrays.

Using PHP and HTML, the HTML form code can be re-written to have the server create a PHP array of your friends’ names, like this:

HTML Form:

<form method="post" action="">
    <p>Enter your friend's names (first, last):</p>
    <input maxlength="30" name="friend[]" size="30" type="text" />
    <input maxlength="30" name="friend[]" size="30" type="text" />
    <input maxlength="30" name="friend[]" size="30" type="text" />
    <input maxlength="30" name="friend[]" size="30" type="text" />
    <input maxlength="30" name="friend[]" size="30" type="text" />
    <input maxlength="30" name="friend[]" size="30" type="text" />
    <input maxlength="30" name="friend[]" size="30" type="text" />
    <input maxlength="30" name="friend[]" size="30" type="text" />
    <input maxlength="30" name="friend[]" size="30" type="text" />
    <input maxlength="30" name="friend[]" size="30" type="text" />
    <input type="submit" value="Submit" />
</form>

Server-Side PHP:

// Loop through the friend array
foreach ($_POST['friend'] as $value) {
    // Do something with each valid friend entry ...
    if ($value) {
        echo $value."<br />";
        ...
    }
}

Let’s walk through that PHP code.

It’s fairly simple. We walk through the php $_POST[‘friend’] array that we retrieved from the HTML form using foreach and for all of the entries on the form that the user typed in we do something with (in this case we simply echo them to the screen).

This simple foreach loop will save you time and the good part is that you can have any number of friends on your form (I’m sure there’s a maximum somewhere though.. 256 maybe?) and this block of code will still work.

In the next article I’ll show you how to do the same thing with ColdFusion.

PHP Tricks: Eliminate any unwanted characters from a string

Hi all.

I’ve been looking for a handy/graceful way to do this for a while and I thought I’d share this little php trick with you in the hopes that it’ll save you some time if you ever need it. If anyone reading this can quickly convert this example into other languages such as perl, coldfusion, ruby, c, c++ please be my guest and post it as a comment or as a trackback to this blog.

What I wanted to do

I wanted to scrub any characters out of a string that were not alphanumeric. That is, not “a” to “z” and “0” to “9”. Thankfully, PHP has extensive regular expressions support so that’s what we’ll use.

Why

I needed to store files uploaded through PHP on my Linux machine using a filename chosen by the user. A web site I’m working on requires users to upload media (images, video, music, et. al) and in order to save the files on the hard disk. This functionality prevents code failure by making the filename valid in UNIX filesystems.

The Code

/**
 * Converts a string to a valid UNIX filename.
 * @param $string The filename to be converted
 * @return $string The filename converted
 */
function convert_to_filename ($string) {

  // Replace spaces with underscores and makes the string lowercase
  $string = str_replace (" ", "_", $string);
  $string = str_replace ("..", ".", $string);
  $string = strtolower ($string);

  // Match any character that is not in our whitelist
  preg_match_all ("/[^0-9^a-z^_^.]/", $string, $matches);

  // Loop through the matches with foreach
  foreach ($matches[0] as $value) {
    $string = str_replace($value, "", $string);
  }
  return $string;
}

Usage

Simply call the convert_to_filename function and pass the filename/string along. For example:

$valid_filename = convert_to_filename ($original_filename);

How it works

Almost the entire function is self-explanatory as long as you have a bit of experience with PHP. The part that does the actual deed may need some explanation, however. Especially if you’re relatively new to regular expressions. The part that strips the bad characters from the filename string is started first by this line, which uses a regular expression to make an array called $matches of all of the characters that are NOT a-z, 0-9, a period, or an underscore:

preg_match_all ("/[^0-9^a-z^_^.]/", $string, $matches);

Then, we simply walk through the array replacing the offending character with nothing using the PHP function str_replace.

Functions Used

The functions/constructs used in this article are

Top 5 Firefox Extensions for Web Developers

You might be a web developer. You might need to know what HTML element is under your cursor at any given time. You might need to know the hexadecimal value of a pixel is under your cursor at any time. You might have a mile-long CSS file inherited from multiple projects and wonder: “Which styles still apply and which are no longer used?”

Fear not my fellow web developers, web designers, programmers, whateverrers! These 5 Firefox Extensions will help you chop the time spent on any web development task so you can get back to reading blogs during the day. Or work. You choose.

Without further ado, here they are:


#1 – Web Developer Extension

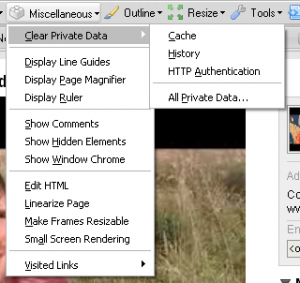
I don’t think I’ve ever used a web browser-based tool as much as I have this one. It’s saved me so much time and helped me solve so many problems over the past year. It does practically everything. With tools like “Resize Window” which lets you resize your window to a certain pixel width and height and “View Generated Source” which lets you see the source code used in the website AFTER Javascript runs — Instead of showing function(var 1, var 2) it will actually show the variables that went into that function e.g., function(“john”, “rockefeller”). Cool huh?

Cool features:

  1. A ruler you can use to measure the size of tables, divs, or anything else on your page.
  2. Disable stylesheets to see what your site looks like without any styles whatsoever.
  3. Display alt tags, image file sizes, image paths, and more.
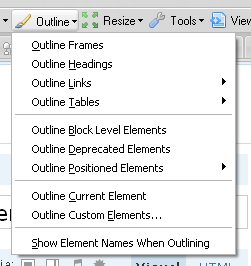
  4. “Outline Block Elements” will automatically outline divs, paragraphs, spans, and other elements on your site. Very handy.
  5. “Outline Current Element” will display the element id and name for any element underneath your cursor. Unbelievably handy.

Sample Screenshots:

Outline elementsMisc functions


#2 – ColorZilla

I’m sure we’ve all seen a cool color on a page, whether it’s an image or cell background, and said “Oh man I love that color. I could eat it. I wonder what the hex value is so I can use it on my site. Or in case I get hungry.” Well, you could always take a screenshot, load up The Gimp, use the Color Picker tool to determine the hex color value, but who needs to do that when you’ve got ColorZilla installed?

ColorZilla will display the hex color and RGB value of any color under your cursor. Very, very handy.


#3 –SearchStatus

This handy little extension will show you the Google PageRank of whatever site you are on as well as the less-important-but-for-some-reason-still-used Alexa Ranking.

PageRank Plugin


#4 – Dust-Me Selectors

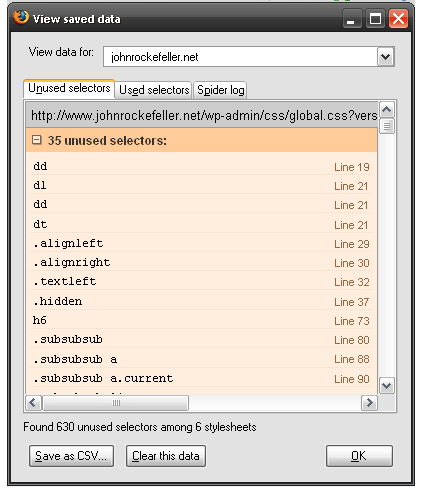
This handy little Firefox Extension will tell you which CSS styles are not found on your pages. It works per domain, so surf all of the pages of your site and a comprehensive collection of unused styles will be shown which you can then promptly delete from your stylesheet, thereby increasing the performance of your site.

Very very, cool.


#5 – Firebug

No Web Developer’s tool-belt would be complete without the illustrious Firebug. The list of features here is incredibly long, but so is the list of Web Developers who have saved hours of work using it. Their own website explains it better than I would but you’ve got to ask yourself one question: What kind of web developer are you if you aren’t already using this??

I hope you’ve enjoyed this list and found some of the links useful. If you’ve got something to say about these tools or even have a list of handy tools you use that might think others would find useful, please post a comment with a few links. Thanks!

Using FFMpeg to Convert mpg or mov to flv

If you need to use a command-line program to convert between different movie or media formats, it’s likely you’ll end up using ffmpeg. ffmpeg is the de facto standard for converting file formats in *nix and FreeBSD environments.

Using the program from the command-line is like using any other program. There are a large amount of switches and options you can use to change the functionality of ffmpeg, including video resolution, video quality, audio compression and quality, framerate, and more!

There are many ways to download ffmpeg. Many vary on your distribution of Linux or other Operating System. In many cases, ffmpeg may already be installed and ready for you to use. For Mandriva users, ffmpeg is available using urpmi or the “Add/Remove Software” program in the control panel.

In case you simply need to convert a video from mov or mpeg format to Flash Video (flv) here is the command that I use:

# ffmpeg -i <filename.mpg> -deinterlace -ar 44100 -r 25 -qmin 3 -qmax 6 <filename.flv>

This will convert your movie to Flash video (.flv extension) at the same resolution it went in as (for example 480×392 pixels in width and height), deinterlace the video, set the audio frequency to 44100 (high quality), the video framerate to be 25 frames per second, and set the video quality between 3 and 6, which will give you very good yet quickly servable results. If you’re shipping this video on CD or DVD you can set the qmin and qmax values lower (lower = higher quality) but for streaming video this is very, very good and very close to the original without being massive in size.

In fact, the one thing that requires some explanation are the qmin and qmax values. It’s a slightly complicated subject but can be easily explained by thinking of qmin and qmax as how much quality you want to take away from your video, between those two numbers. The minimum qmin and qmax is 1 and the maximum is 31.

If the video size is too large after using this command example and you would like a smaller file, try increasing qmax first until you reach it’s maximum. It’s likely that you will find a happy number in there without having to adjust the qmin value.

If you need to convert several videos, say from a directory, you can use this script:

<?php
if ($handle = opendir('.')) {
    while (false !== ($file = readdir($handle))) {
        if ($file != "." && $file != ".." && strpos($file, "mpg") !== false) {
                $new_filename = str_replace(" ", "_", strtolower(str_replace("mpg", "flv", $file)));
                $file = str_replace(" ", "\ ", $file);
                exec("ffmpeg -i $file -deinterlace -ar 44100 -r 25 -qmin 3 -qmax 6 $new_filename");
        }
    }
    closedir($handle);
}
?>

It’s fairly self-explanatory, but the above script simply fetches a list of all of the files in the current directory and executes the ffmpeg program for each file in that list that has the extension “.mpg”.

It should be noted that converting between different video file formats may require a license to do so by the patent holders of that file format. Be sure that you have dotted your “i’s” and crossed your “t’s”.

PHP Tricks: How To Handle Multiple Domains

This is really handy for those of us who have the same code handling multiple sites or multiple sub-domains.

A case in point: When I coded NetBoardz (my free forum hosting service now defunct), I had one codebase handling all 250 forums. How? Simple. When the code runs, it determines which site the user is loading and does different things (like using different databases) dynamically.

How to determine the domain the user is using to view your site:

$domain = $_SERVER['HTTP_HOST'];
if ($domain == "xyz") {
    ...
} else if ($domain == "uvw") {
    ...
}

In the example above you can see that we have put the domain that the user has used to view your site into the $domain variable, loading the value from the PHP global variable, $_SERVER. The $_SERVER variable is global, which means you can access it anytime and anywhere in your code.

More information on PHP’s predefined global variables.

How to determine the sub-domain the user is using to view your site:

Sample code is from NetBoardz, which is based off of phpBB 2:

$subdomain = strpos($_SERVER['HTTP_HOST'], ".");
$subdomain = substr($_SERVER['HTTP_HOST'], 0, $subdomain);
$dbname = "nb_".$subdomain;
mysql_select_db($dbname, $sql_link);

Here you can see that we retreived the whole hostname, including the top-level domain and subdomain, then used the PHP functions strpos and substr to take anything before the first dot. For example, the whole hostname “testforum.netboardz.com” passed through this code would end up as “testforum”.

After, we use that subdomain name to calculate which forum database to load. Of course, once you have the domain or subdomain in a variable, you are able to handle your code as you wish!

Validating Domain Names and Websites

If you’re ever in need of a regular expression that will validate every domain name to make sure what the user gave you is valid, you can use Shaun Inman’s Regex. I have to admit, while it’s pretty uber, it’s probably easier just to use cURL to see if the URL is valid.

To accomplish website validation using cURL, there is a snippet of code available on the official PHP homepage: http://ca3.php.net/manual/en/function.curl-exec.php#77167. If the HTTP status is 200 after requesting the website using cURL, the website is valid. If not, you can return an error to the user to verify their URL.