Help the world: Run BOINC

BOINC Logo
BOINC Logo

What is your computer doing most of the day? Chances are, not much. Sure you’re editing a document or checking your E-Mail but is that really utilizing your computer’s full potential? Unless your computer is 10 years old, probably not!

So, what to do with all of this extra horsepower that’s just sitting there? Donate it to science!

The Berkeley Open Infrastructure for Network Computing or BOINC is a project that takes advantage of the untapped computing power of ordinary desktop computers and puts it to good use by participating in projects such as finding a cure for cancer, the search for extra-terrestrial intelligence, and fighting AIDS.

You can specify the program to run all the time like I do, but out of the box it runs only as a screensaver, which means that it will not make your computer slow and only is used when your computer is free. Having the program run full-time is a good option when your computer has more than one processor core (a dual-core or quad-core computer in most cases).

Over 500,000 computers worldwide work together to create a networked suptercomputer using distributed computing to solve some of the world’s problems.

After downloading the program to your computer and installing it you are asked to join a “project”. There are many projects that take advantage of the extensive network of desktop, servers, and super computers running the BOINC program. The ones mentioned before are just 3 of the many available to you.

An up-to-date list of the projects you can join.

I am, at the moment, associated with several projects including World Community Grid, SETI@Home, Rosetta@home, and Einstein@home.

For every bit of work you do as a BOINC user, you gain credits.  You, your team (if you choose to join one [Go Team Canada!]), and your country receive credits based on your work completed.

Rocky1138's BOINC statistics
Rocky1138’s BOINC statistics

Using BOINC is a fun way to take advantage of an idle computer. You can help out scientists all over the world across a wide array of projects. From aliens to sudoku puzzles, BOINC computes them all with lightning speed.

Sign up for free today!

The 5 Best Things About Being A Developer

I was at work today and had a few of these happen. Because of that, I was inspired to write this post. These things happen to programmers young and old, novice or expert. Here’s the list.

1. Writing code that works the first time

Oh sure. All of us write flawless code, right? There’s just something that feels great about writing a sizeable portion of code and then having it do exactly what you wanted straight away. Especially if you’re newer with a certain language. Confidence++.

2. Finishing a Project

Starting a project is exciting. Finishing is ethereal. My typical work method is based on doing all of the hard work first, thereby eliminating any unintended delays before launch. Unfortunately this means that the last 10% of any project is the most tedious and dreary as it’s filled with things like pixel-hunting or resizing images. Once the last few lines of code are written and tested, life is bliss.

3. Optimization / Refactoring / Reducing # of Lines of Code

Few things in development are as good as the feeling you get when you took that 4x nested for-loop with its switches and if blocks and converted it into a simple, 5-line function. It’s why I get up in the morning. OK maybe not that exciting, but still.

Optimization may not be the best description for this, but in a way it is a sort of optimization of how efficiently your code works.

4. Seeing Marketing For a Product You Worked On

I smile every time I visit my parents as there is a very large billboard advertising a site that I had a part in developing. I know that nowhere on the sign it says my name and that no one even knows I worked on it, but inside I feel good that someone, somewhere is finding something I helped to create useful.

Another example of this would be seeing people play a videogame you created or hearing your song on the radio (if you were a musician).

And, finally:

5. Learning Something New and Useful

I try to make it a point that every day I learn something new and useful to make my work better, faster, and more efficient. I say “new and useful” since new isn’t always better than old. Especially with computers and software.

Whether it’s some new Linux commands (split and cat for me a few weeks ago) or a big jump like using source control, making yourself and your team better at what you do is what it’s all about.

HTML Input Forms – Sending in a List to ColdFusion

HTML + ColdFusion Lists

This post is a continuation of a previous article I wrote about sending in an array through HTML to your php script. This article deals with doing a similar thing except using ColdFusion. If you are new to the subject, it is highly recommended that you read the first article.

Though newer versions of ColdFusion offer support for arrays, earlier versions were centered instead around using lists. Because of this fact, this example will detail how to send a list into ColdFusion then loop over that list, allowing you you to perform whatever actions you need to do in your HTML form.

The Code

<form method="post" action="">
  <p>Enter your friend's names (first, last):</p>
  <input maxlength="30" name="friend" size="30" type="text" />
  <input maxlength="30" name="friend" size="30" type="text" />
  <input maxlength="30" name="friend" size="30" type="text" />
  <input maxlength="30" name="friend" size="30" type="text" />
  <input maxlength="30" name="friend" size="30" type="text" />
  <input maxlength="30" name="friend" size="30" type="text" />
  <input maxlength="30" name="friend" size="30" type="text" />
  <input maxlength="30" name="friend" size="30" type="text" />
  <input maxlength="30" name="friend" size="30" type="text" />
  <input maxlength="30" name="friend" size="30" type="text" />
  <input type="submit" value="Submit" />

</form>

<cfif isDefined("Form.friend")>
  <cfloop index="ListElement" list=#Form.friend#>
     <cfoutput>#ListElement#</cfoutput>
     <!--- Do something with this value --->
     </cfloop>
  </cfif>
 

How It Works

Because all of the <input> elements in the form have the same “name” value, your ColdFusion server will create a list variable called #Form.name# that you will be able to loop through and perform actions on each of the elements.

A handy feature of ColdFusion is that when it creates the list it doesn’t matter if your user enters data only in one of the boxes or only the last one. The list is put together for you of valid inputs from the user. Using this method, you don’t need to check to make sure the value isn’t blank!

Have fun!

How To Setup A Local ColdFusion Development Environment in Windows

Interested in programming in the ColdFusion language?

Setting up a ColdFusion development environment on your local computer is easy! Just follow these simple steps. This small walkthrough will enable you to develop and execute ColdFusion web applications on your Windows PC. This software is not intended for commercial use — for that, you’ll need a licensed copy.

1. Download ColdFusion Developer Edition (for free!)

You may need to sign into your Adobe.com account (or create one if you haven’t got one yet) in order to download the Developer Edition of the ColdFusion server.

Download ColdFusion Developer Edition from Adobe.com.

2. Installation Options

After downloading the software, begin installation. For all installation screens you should select all default options except in the screens shown in the images below. These settings will allow you to have the ColdFusion app server run on your computer locally.

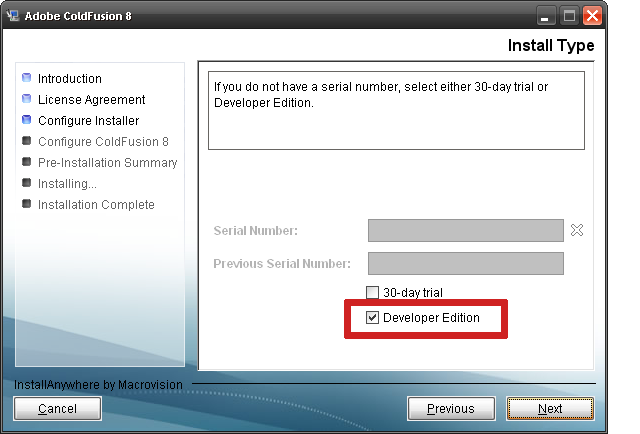
Screen 1: Skip Product Key by selecting “Developer Edition”

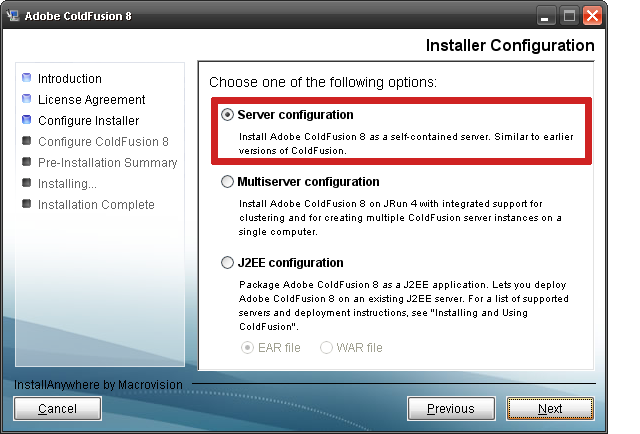
Screen 2: Select “Server configuration”

Step 3:Select “Built-in web server” (This one is really important!)

3. Finish Installation

Once ColdFusion is finished, it will launch the completion script in your web browser and finish the installation. After that is complete, you will be taken to the ColdFusion Administrator screen, which will allow you to change all of your ColdFusion server settings and looks like this:

In the future you may need to change ColdFusion settings on your computer. This is the panel you will use to make those changes.

If you installed ColdFusion correctly, clicking here will take you to your ColdFusion Administrator.

Happy programming!

HTML Input Forms – Sending in an array in PHP

Arrays? Who needs ’em?

If you’re into developing websites chances are there will be sometime during your life/career when you’ll need to have users enter data into a HTML form but you have no idea how many of a certain variable they’re going to be sending in or how much data they’re going to fill in of the same type.

An example would be a HTML form that has three input boxes, one for each of your friend’s names (first and last). You are able to enter between 1 and 3 friends into the boxes. For such an example your HTML form may look something like this:

<form method="post" action="">
    <p>Enter your friend's names (first, last):</p>
    <input maxlength="30" name="friend1" size="30" type="text" />
    <input maxlength="30" name="friend2" size="30" type="text" />
    <input maxlength="30" name="friend3" size="30" type="text" />
    <input type="submit" value="Submit" />
</form>

That all looks fairly normal. Keep in mind this is a simple example. But, what about if you’ve got the option to enter 10 friends. What about 20? You might have to re-work your form if you want to enter 20 friends. Any more than 10 and you might want to look at alternatives like importing from XML or CSV.

Let’s say you’ve got the option to enter up to 10 names. Your increasingly ugly form would then look like this:

<form method="post" action="">   <p>Enter your friend's names (first, last):</p>   <input maxlength="30" name="friend1" size="30" type="text" />   <input maxlength="30" name="friend2" size="30" type="text" />   <input maxlength="30" name="friend3" size="30" type="text" />   <input maxlength="30" name="friend4" size="30" type="text" />   <input maxlength="30" name="friend5" size="30" type="text" />   <input maxlength="30" name="friend6" size="30" type="text" />   <input maxlength="30" name="friend7" size="30" type="text" />   <input maxlength="30" name="friend8" size="30" type="text" />   <input maxlength="30" name="friend9" size="30" type="text" />   <input maxlength="30" name="friend10" size="30" type="text" />   <input type="submit" value="Submit" /> </form>

When you submit this form then you’ve got to check each input box to first ensure they entered a variable and then check to see what that variable is. With so many input boxes to check from it becomes a repetitive and arduous task.

Example PHP code:

// Good God.. okay let's start this horrible task
if ($_POST['friend1']) {
    doSomething($_POST['friend1']);
} else {
    complain();
}
if ($_POST['friend2']) {
    ...
} else {
    complain();
}
if ($_POST['friend3']) {
    ...
} else {
    ...
}
...
...
// There's got to be a better way!

Save time with arrays.

Using PHP and HTML, the HTML form code can be re-written to have the server create a PHP array of your friends’ names, like this:

HTML Form:

<form method="post" action="">
    <p>Enter your friend's names (first, last):</p>
    <input maxlength="30" name="friend[]" size="30" type="text" />
    <input maxlength="30" name="friend[]" size="30" type="text" />
    <input maxlength="30" name="friend[]" size="30" type="text" />
    <input maxlength="30" name="friend[]" size="30" type="text" />
    <input maxlength="30" name="friend[]" size="30" type="text" />
    <input maxlength="30" name="friend[]" size="30" type="text" />
    <input maxlength="30" name="friend[]" size="30" type="text" />
    <input maxlength="30" name="friend[]" size="30" type="text" />
    <input maxlength="30" name="friend[]" size="30" type="text" />
    <input maxlength="30" name="friend[]" size="30" type="text" />
    <input type="submit" value="Submit" />
</form>

Server-Side PHP:

// Loop through the friend array
foreach ($_POST['friend'] as $value) {
    // Do something with each valid friend entry ...
    if ($value) {
        echo $value."<br />";
        ...
    }
}

Let’s walk through that PHP code.

It’s fairly simple. We walk through the php $_POST[‘friend’] array that we retrieved from the HTML form using foreach and for all of the entries on the form that the user typed in we do something with (in this case we simply echo them to the screen).

This simple foreach loop will save you time and the good part is that you can have any number of friends on your form (I’m sure there’s a maximum somewhere though.. 256 maybe?) and this block of code will still work.

In the next article I’ll show you how to do the same thing with ColdFusion.

PHP Tricks: Eliminate any unwanted characters from a string

Hi all.

I’ve been looking for a handy/graceful way to do this for a while and I thought I’d share this little php trick with you in the hopes that it’ll save you some time if you ever need it. If anyone reading this can quickly convert this example into other languages such as perl, coldfusion, ruby, c, c++ please be my guest and post it as a comment or as a trackback to this blog.

What I wanted to do

I wanted to scrub any characters out of a string that were not alphanumeric. That is, not “a” to “z” and “0” to “9”. Thankfully, PHP has extensive regular expressions support so that’s what we’ll use.

Why

I needed to store files uploaded through PHP on my Linux machine using a filename chosen by the user. A web site I’m working on requires users to upload media (images, video, music, et. al) and in order to save the files on the hard disk. This functionality prevents code failure by making the filename valid in UNIX filesystems.

The Code

/**
 * Converts a string to a valid UNIX filename.
 * @param $string The filename to be converted
 * @return $string The filename converted
 */
function convert_to_filename ($string) {

  // Replace spaces with underscores and makes the string lowercase
  $string = str_replace (" ", "_", $string);
  $string = str_replace ("..", ".", $string);
  $string = strtolower ($string);

  // Match any character that is not in our whitelist
  preg_match_all ("/[^0-9^a-z^_^.]/", $string, $matches);

  // Loop through the matches with foreach
  foreach ($matches[0] as $value) {
    $string = str_replace($value, "", $string);
  }
  return $string;
}

Usage

Simply call the convert_to_filename function and pass the filename/string along. For example:

$valid_filename = convert_to_filename ($original_filename);

How it works

Almost the entire function is self-explanatory as long as you have a bit of experience with PHP. The part that does the actual deed may need some explanation, however. Especially if you’re relatively new to regular expressions. The part that strips the bad characters from the filename string is started first by this line, which uses a regular expression to make an array called $matches of all of the characters that are NOT a-z, 0-9, a period, or an underscore:

preg_match_all ("/[^0-9^a-z^_^.]/", $string, $matches);

Then, we simply walk through the array replacing the offending character with nothing using the PHP function str_replace.

Functions Used

The functions/constructs used in this article are

linuX-gamers – Boot n’Play Linux Games Disc

This thing is really, really cool.

I saw on Distro Watch today the announcement of a new development version of the “boot n’play” Linux games DVD available for download and was instantly enthralled with the idea. It’s like having a free games console on your PC. You put the disc in, reboot, and play. Right off the DVD. You can save your savegame on your USB memory card. There are quite a few high-quality games included with this thing and a lot of them provide multiplayer fun. Check out the games list for further info.

If you’re looking for a change from the normal PC game scene, download the DVD torrent and start playing! Also, don’t forget to submit all the bugs you find in the bugtracker!

Have fun!

Top 5 Firefox Extensions for Web Developers

You might be a web developer. You might need to know what HTML element is under your cursor at any given time. You might need to know the hexadecimal value of a pixel is under your cursor at any time. You might have a mile-long CSS file inherited from multiple projects and wonder: “Which styles still apply and which are no longer used?”

Fear not my fellow web developers, web designers, programmers, whateverrers! These 5 Firefox Extensions will help you chop the time spent on any web development task so you can get back to reading blogs during the day. Or work. You choose.

Without further ado, here they are:


#1 – Web Developer Extension

I don’t think I’ve ever used a web browser-based tool as much as I have this one. It’s saved me so much time and helped me solve so many problems over the past year. It does practically everything. With tools like “Resize Window” which lets you resize your window to a certain pixel width and height and “View Generated Source” which lets you see the source code used in the website AFTER Javascript runs — Instead of showing function(var 1, var 2) it will actually show the variables that went into that function e.g., function(“john”, “rockefeller”). Cool huh?

Cool features:

  1. A ruler you can use to measure the size of tables, divs, or anything else on your page.
  2. Disable stylesheets to see what your site looks like without any styles whatsoever.
  3. Display alt tags, image file sizes, image paths, and more.
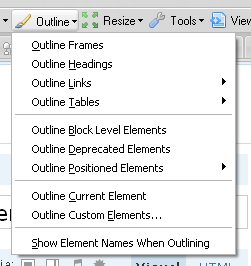
  4. “Outline Block Elements” will automatically outline divs, paragraphs, spans, and other elements on your site. Very handy.
  5. “Outline Current Element” will display the element id and name for any element underneath your cursor. Unbelievably handy.

Sample Screenshots:

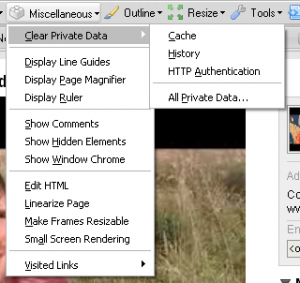
Outline elementsMisc functions


#2 – ColorZilla

I’m sure we’ve all seen a cool color on a page, whether it’s an image or cell background, and said “Oh man I love that color. I could eat it. I wonder what the hex value is so I can use it on my site. Or in case I get hungry.” Well, you could always take a screenshot, load up The Gimp, use the Color Picker tool to determine the hex color value, but who needs to do that when you’ve got ColorZilla installed?

ColorZilla will display the hex color and RGB value of any color under your cursor. Very, very handy.


#3 –SearchStatus

This handy little extension will show you the Google PageRank of whatever site you are on as well as the less-important-but-for-some-reason-still-used Alexa Ranking.

PageRank Plugin


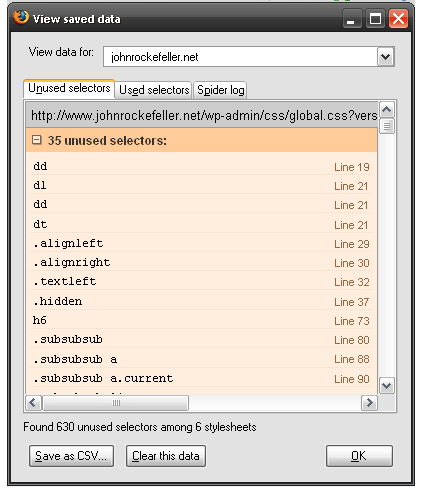
#4 – Dust-Me Selectors

This handy little Firefox Extension will tell you which CSS styles are not found on your pages. It works per domain, so surf all of the pages of your site and a comprehensive collection of unused styles will be shown which you can then promptly delete from your stylesheet, thereby increasing the performance of your site.

Very very, cool.


#5 – Firebug

No Web Developer’s tool-belt would be complete without the illustrious Firebug. The list of features here is incredibly long, but so is the list of Web Developers who have saved hours of work using it. Their own website explains it better than I would but you’ve got to ask yourself one question: What kind of web developer are you if you aren’t already using this??

I hope you’ve enjoyed this list and found some of the links useful. If you’ve got something to say about these tools or even have a list of handy tools you use that might think others would find useful, please post a comment with a few links. Thanks!

Source Control – svn + ssh (subversion to the rescue!)

There comes a point in any developer’s life where he/she must work with one or more people on the same project. What’s the correct procedure? How is this done? There are a number of different ways. Some good, some bad.

The Bad: You may have a method in place where only one person can be working on a file at one time. You have to notify the other developers that the file is free when you’re done with it. They download the latest copy every time and so do you so as to not overwrite the work that was just completed.

Some of you may say “Well, why is this bad? We’ve done this for months! It’s worked out pretty well so far!” There are a number of different answers to this question, which I’m going to deal with right now.

This is a bad method because time is money and this method is much, much slower. What is a programmer to do while he or she is waiting for the file to be free for editing? Read blogs?

Time is money.

If the company had source control, both programmers could essentially be working on the same file at the same time. I say essentially because technically they both have their own versions of it and the source control program (Subversion is the one I would like to write about today) will merge their changes together intelligently. Oh wait, this isn’t good. Now you won’t have time to read my blog because you’ll be working!

The second reason the “one person, one file, one time” method is bad is because it’s extremely risky for accidentally deleting work and wasting hours of productivity. As a developer, you should be constantly using and building work methods that prevent failure at any level you are involved with.

How would you feel if you worked on a function for two hours, then because someone overwrote the file with their copy all your work was lost? The reverse is also true: How would you feel if when you saved your work you accidentally overwrote a day’s worth of work and changes?

Time is money. Again.

“But before you save your file you can make a backup of the original file!” I hear you saying, way in the back. Of course you could, but how far do you want to take that methodology? Will you remember every time? Will everyone who works on the project remember, every time? What if it’s a one-line fix? “Oh, I’ll just log in quickly and fix that typo.” and the like are sentences that run shivers down my spine when thinking about using this method.

So the person logs in and fixes the typo. Because it was a small fix, they never checked to see if anyone was working on the file. So now we’ve got two changes that need to be merged somehow. I’m sure that person will be wondering the next day why the typo has reappeared after you save your file!

Okay. So what’s the solution then, smarty-pants?

The good: The solution is source control. It’s not new. It’s been tested and proven multiple times in the computing industry and there are some big players that use it. There are a multitude of different kinds that do some different things, but to the layman the simplest way to look at it is to use a common source control program called Subversion. Everyone’s heard of it, a ton of people use it. Nerds of different flavors will tell you there are better ones out there, and that may be true, but Subversion works. For a lot of folks.

The concept is simple: A project is set up in the Subversion software. Two programmers “check out” (think of checking out at a grocery store) a copy of the project on their computer or development server and work completely independently.

Programmer “Jane” and “Jack” are both working on the same project. Jane is building a module not related to Jack but in a few cases they may modify the same files. That’s no cause for concern, deliberation, or communication. They happily keep on working until their particular task is complete.

Jane finishes first and “checks in” her work by “committing” her work to the Subversion server. Everything goes as planned and her work is then “committed” to the main project files. Jack finishes his work a few minutes later and attempts to check in his work. Uh-oh! Jack’s copy of the project is slightly out-of-date! No big deal, he issues the “svn update” command and all of the files Jane edited are updated on Jack’s computer. Any changes to the files that they both worked on are merged automatically.

After he has updated his copy of the project he commits his files and goes home for the day.

Wow! Sounds great. But what happens if Jack deletes parts of the source code that Jane edited?

This sort of thing is called a conflict. They’re pretty rare and in most cases you can resolve the conflict in a few minutes. When you edit a file that is marked “in conflict” by Subversion, it shows the added and removed portions. You can make adjustments based on which is correct and issue the “svn resolve” command to consider the issue resolved then commit the correct version.

Cool beans. How do I start?

First, you install Subversion on your server. Programmers will connect to this machine, “check out” a copy of the project, and begin work. In most cases, installing Subversion takes less than 10 minutes. You should check with your particular Operating System documentation to see how to install Subversion, but in Mandriva Linux you can do it through the command-line with this command (logged in as root):

# urpmi subversion

After installing Subversion, you will need to pick a spot on your hard drive where you want your project files to be located. For me, that’s almost always /home/svn. Change directory to your project directory and type:

# svnadmin create <projectname>

This will create a directory and place the important Subversion bits inside it for this all to function. Make sure the directory (and all subdirectories) are writeable by the group of users that will be working on the project by first first changing the ownership to a particular user and group with this command (run as root):

# chown -R user:devgroup <projectname>

This command makes the project directory and any directory inside of it owned by user and associated with the devgroup group. After this you will need to set the permissions on the directory so that the devgroup has read, write, and execute access to this directory. We do that by executing this command (run as root):

# chmod -R 775 <projectname>

Great! Our project is ready to roll. Note that this assumes you have ssh enabled on this server (very likely by in Linux, FreeBSD, and in fact most others *nix variants).

Next, we’ll need to check out a copy of our project. Stay tuned for that tutorial, coming soon!

Using FFMpeg to Convert mpg or mov to flv

If you need to use a command-line program to convert between different movie or media formats, it’s likely you’ll end up using ffmpeg. ffmpeg is the de facto standard for converting file formats in *nix and FreeBSD environments.

Using the program from the command-line is like using any other program. There are a large amount of switches and options you can use to change the functionality of ffmpeg, including video resolution, video quality, audio compression and quality, framerate, and more!

There are many ways to download ffmpeg. Many vary on your distribution of Linux or other Operating System. In many cases, ffmpeg may already be installed and ready for you to use. For Mandriva users, ffmpeg is available using urpmi or the “Add/Remove Software” program in the control panel.

In case you simply need to convert a video from mov or mpeg format to Flash Video (flv) here is the command that I use:

# ffmpeg -i <filename.mpg> -deinterlace -ar 44100 -r 25 -qmin 3 -qmax 6 <filename.flv>

This will convert your movie to Flash video (.flv extension) at the same resolution it went in as (for example 480×392 pixels in width and height), deinterlace the video, set the audio frequency to 44100 (high quality), the video framerate to be 25 frames per second, and set the video quality between 3 and 6, which will give you very good yet quickly servable results. If you’re shipping this video on CD or DVD you can set the qmin and qmax values lower (lower = higher quality) but for streaming video this is very, very good and very close to the original without being massive in size.

In fact, the one thing that requires some explanation are the qmin and qmax values. It’s a slightly complicated subject but can be easily explained by thinking of qmin and qmax as how much quality you want to take away from your video, between those two numbers. The minimum qmin and qmax is 1 and the maximum is 31.

If the video size is too large after using this command example and you would like a smaller file, try increasing qmax first until you reach it’s maximum. It’s likely that you will find a happy number in there without having to adjust the qmin value.

If you need to convert several videos, say from a directory, you can use this script:

<?php
if ($handle = opendir('.')) {
    while (false !== ($file = readdir($handle))) {
        if ($file != "." && $file != ".." && strpos($file, "mpg") !== false) {
                $new_filename = str_replace(" ", "_", strtolower(str_replace("mpg", "flv", $file)));
                $file = str_replace(" ", "\ ", $file);
                exec("ffmpeg -i $file -deinterlace -ar 44100 -r 25 -qmin 3 -qmax 6 $new_filename");
        }
    }
    closedir($handle);
}
?>

It’s fairly self-explanatory, but the above script simply fetches a list of all of the files in the current directory and executes the ffmpeg program for each file in that list that has the extension “.mpg”.

It should be noted that converting between different video file formats may require a license to do so by the patent holders of that file format. Be sure that you have dotted your “i’s” and crossed your “t’s”.

Linux/Unix: Using split and cat to split large files for transfer

I learned about a really handy command-line tool today that you can use in Linux, Unix, or FreeBSD to split any large file to any size that you like. These two commands, split and cat, can work together to split your files for easy transfer or storage. Then, you can concatenate them back together again to make one file.

If you’ve got a small maximum filesize to your E-Mail attachments or your backups take up slightly more than a DVD or CD, then you can definitely use this. And, it’s really, really simple.

First, split the file using the command “split”, specifying how many megabytes you want to split your file into.

# split -b 1024m <filename>

This will split your file into as many parts as needed, in 1024MB chunks, typically with the name starting as xaa, xab, xac, and so on. You can then burn these files to a disc or E-Mail them (though if you’re E-Mailing it might be better to specify a smaller chunk size. For example, you’d use “-b 1m” for 1MB chunks).

Keep in mind that once you’ve split your files, in order to put them back together again you’ll need all of the files. If you’re missing one of the files, this operation will not work. But that makes sense, doesn’t it? :)

Once you’ve split your files you can easily put them back together again using the command “cat”.

This is even simpler.

# cat xa* > <filename>

This command tells cat to concatenate all the files starting with “xa” and put them into one new file.

Many zip, rar, or other archiving tools will allow you to split the file you’re zipping across multiple volumes, but the benefit of this is that you can split any file you like, even MP3 or jpg files. Split to your heart’s content!

PHP Tricks: How To Handle Multiple Domains

This is really handy for those of us who have the same code handling multiple sites or multiple sub-domains.

A case in point: When I coded NetBoardz (my free forum hosting service now defunct), I had one codebase handling all 250 forums. How? Simple. When the code runs, it determines which site the user is loading and does different things (like using different databases) dynamically.

How to determine the domain the user is using to view your site:

$domain = $_SERVER['HTTP_HOST'];
if ($domain == "xyz") {
    ...
} else if ($domain == "uvw") {
    ...
}

In the example above you can see that we have put the domain that the user has used to view your site into the $domain variable, loading the value from the PHP global variable, $_SERVER. The $_SERVER variable is global, which means you can access it anytime and anywhere in your code.

More information on PHP’s predefined global variables.

How to determine the sub-domain the user is using to view your site:

Sample code is from NetBoardz, which is based off of phpBB 2:

$subdomain = strpos($_SERVER['HTTP_HOST'], ".");
$subdomain = substr($_SERVER['HTTP_HOST'], 0, $subdomain);
$dbname = "nb_".$subdomain;
mysql_select_db($dbname, $sql_link);

Here you can see that we retreived the whole hostname, including the top-level domain and subdomain, then used the PHP functions strpos and substr to take anything before the first dot. For example, the whole hostname “testforum.netboardz.com” passed through this code would end up as “testforum”.

After, we use that subdomain name to calculate which forum database to load. Of course, once you have the domain or subdomain in a variable, you are able to handle your code as you wish!

Render Your Sites In IE6 With Free Software

If you’re a web developer like me or even a web designer, there comes a time in the development of your site when you need to verify that everything works with Internet Explorer. For small sites or minor tweaks this can wait until the end of the day without much worry. On larger sites, it’s likely you’ll be checking for IE 6 or IE 7 compatibility several times throughout the project.

For those of us who have moved to greener pastures by switching to Linux or for others who have updated their system to Internet Explorer 7, several options exist to view your website in everyone’s favorite web browser: Internet Explorer 6.

In order of success I’ve had with this software, some of the options for Mandriva Linux users are listed below:

#1 – Wine, Wine-Doors, and Internet Explorer 6.

Wine-Doors is a graphical, easy-to-use point and click program that uses Wine. For those unfamiliar with Wine, it is a Windows “compatibility layer” that, in layman’s terms, allows you to run Windows programs like Internet Explorer and Microsoft Office in Linux.

Installing Wine and Wine-Doors in Mandriva Linux is a breeze. Simply open up the software installer in type Wine in the search box. Install both Wine and Wine-Doors.

Once they are installed, open Wine-Doors and click on Internet Explorer 6 to install it. Wine-Doors will take care of everything, including downloading Windows fonts and the Internet Explorer program itself.

Internet Explorer 6 works great for me this way. IE loads quick and displays websites just as it would if it were running on a Windows computer. With some of the other options listed below, the fonts and performance were not as smooth.

#2 – IE NetRenderer – Web-Based Browser Screenshot

This is a unique solution that is truly cross-platform. It’s not perfect – sometimes divs, table widths, or images are off by a few pixels, but for the most part this is a really reliable and quick solution.  The process is simple: You go to their website, paste your website’s address in a form and it will refresh with a screenshot of what your website looks like in IE5.5, IE6, IE7, and IE8 beta (still in beta as of this article’s creation).

Similar, but not free service: Browsershots. Well… It’s free, but you get put into a queue and it could take hours to get your screenshot. Unless you pay. :)

#3 – IEs4Linux

This is another project that is based off of Wine and installs easily on Mandriva Linux as well. You are able to download and extract the installer program from their homepage, but some of the fonts were off for me and it only loaded once. Once I closed the browser it never re-opened.

Also, the program is able to install IE5, IE5.5, and IE6 though I personally was only able to get IE6 installed. All other options resulted in an error. Your mileage may vary.

Crossover Games, PlayOnLinux, Wine, and Cedega

If I had a lot of money…

I’d buy PlayOnLinux and Cedega and Crossover Games (while maintaining a great working relationship with the good folks still at Crossover working on apps) and put together (with some hefty funds behind them) a crack team of DirectX hackers and previous Microsoft DirectX programmers to put together a fully-functional, working DirectX emulator for Mac and Linux. Then, port all those changes back into the Wine trunk while promoting an off-the-shelf Windows games player.

I truly believe that if games worked on Linux flawlessly there would be a greater adoption of Linux on desktops worldwide. I know locally it is a huge hurdle to jump. All of my friends are interested in Linux, two of them have the ISO sitting on their desktop. Why are they not making the switch? One: Games. The other: Sony Vegas. People want to use it but they want their games too!

Game development and publishing companies wouldn’t have to write games to be cross platform if the emulator worked perfectly. They would go on making Windows games while Linux continues to grow in installed user base.

Making games for Linux is not the answer, making Linux work for games is!

Adding and Removing HTML elements with plain-old JavaScript

Sometimes while developing a web application, you need to hide or display certain elements dynamically based on circumstance. For instance, if you’re filling in your personal information and you in the dropdown box you select “other” as your country, the website may be required to display a previously hidden textbox allowing you to type in your country name.

This post, by Dustin Diaz, contains two links, written by the same person at two different times. Which one you choose to use is completely up to your skill and the scope of the project you’re working on. The first, is a simple, easy-to-understand JavaScript code snippet: http://www.dustindiaz.com/add-and-remove-html-elements-dynamically-with-javascript/

The second link is a reprise by the same author almost three years later with a much cleaner implementation of the same functionality in JavaScript. Unfortunately, it requires more knowledge about JavaScript and events, and for a beginner in programming, the first link may be easier to swallow. For the site, click this link: http://www.dustindiaz.com/add-remove-elements-reprise/

Pick your poison :)

Validating Domain Names and Websites

If you’re ever in need of a regular expression that will validate every domain name to make sure what the user gave you is valid, you can use Shaun Inman’s Regex. I have to admit, while it’s pretty uber, it’s probably easier just to use cURL to see if the URL is valid.

To accomplish website validation using cURL, there is a snippet of code available on the official PHP homepage: http://ca3.php.net/manual/en/function.curl-exec.php#77167. If the HTTP status is 200 after requesting the website using cURL, the website is valid. If not, you can return an error to the user to verify their URL.

Complimentary Color Wheel

color-wheel

When designing sites, there comes a point where you need to decide on a color scheme. Usually you will have an idea for one or two basic overall colors that you’d like to have (red and black for Synn Studios for instance), but what about gradients or borders or shading or links?

Enter “Color Wheel” by Antone Roundy.

This is a really, really handy tool for those of us designing a website. You select the most prominent color on your website and it will give you a complete color wheel of complimentary colors. This really helps to speed up the color choices for your pages.